CRUD application in PHP
: learn how to create a CRUD (create, read, update, delete) application using PHP and MySQL database. The completed source code for this project is provided, including a video for easy understanding. This project has features that prevent MySQL injection. The steps to create this crud application are listed below
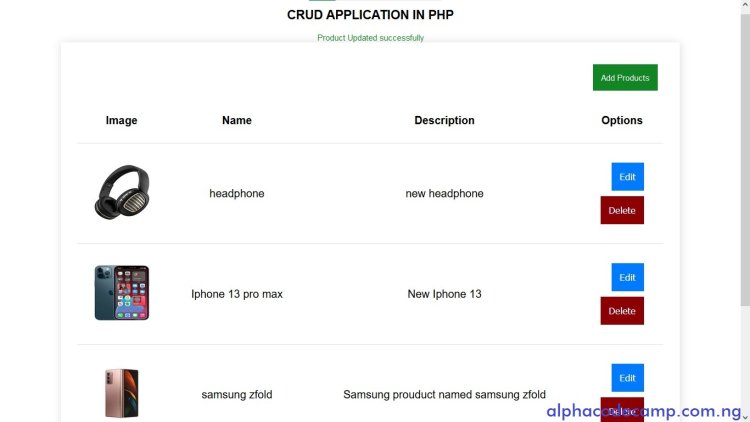
Table of content
- About the CRUD application in PHP
- Features of the CRUD application in PHP
- Script folder includes
- Requirements
- how to create the CRUD application in PHP
- Creating the database.
- creating the database table
- Connecting to the database
- Creating the index page
- Creating the CSS file
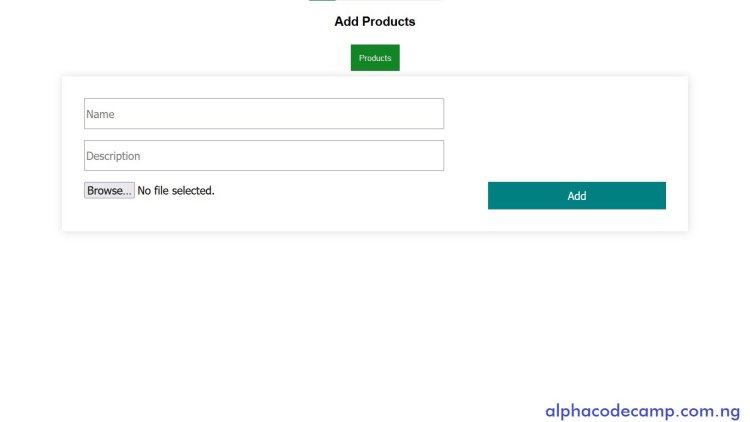
- Creating the add product page
- Creating the edit product page
- Creating the add product Authenticate
- Creating the edit product Authenticate
- Creating the delete product Authenticate
- Structure image
- Video Demo
- How to download and run the source code
- The screenshots
About the CRUD application in PHP
CRUD is a short form of saying Create, Read, Update, Delete. This means getting, inserting, updating, or deleting data from the database in your code. In this project we will be using PHP to create this CRUD application.
This project is secure because it prevents mysql injection when adding products, Products added can be deleted or edited. This Create, Read, Update, Delete Application is written in PHP and mysql database.
Features of the CRUD application in PHP
- Add Products
- Delete Products
- Responsive design
- Update Product
- Displays all error messages
- Displays all success message
- Prevents MYSQL injection
- Good interface
- Uses PDO
- View product image
Script folder Includes
- PHP
- MYSQL Database
- HTML
- CSS
- Readme file
Requirements
- Built using PHP 7.4.2
How to create the CRUD application in PHP
Create a database
For us to store and get back our products, we need to create a database. (MYSQL Database). XAMPP will be used in this project. A video demonstration is provided in this page for easy learning.
- Open your XAMPP Cpanel and start Apache and MYSQL.
- Open your Browser and Go to localhost/phpmyadmin/
- Click on New.
- Type in the database name crud and click on create.
Creating the database tables
- After creating the database, input products and number of columns is 4 then click on Go
- Input and select as seen in the image below and click Save.

Connecting to the database
In other to store and retrieve information from the database, you need to connect to the database from your code.
- Go to [Your local disk]/xampp/htdocs directory and create a folder called crud
- Then go to [Your local disk]/xampp/htdocs/crud
- Create a file called php inside the folder [crud]
- Copy the code below and paste into it.
CONFIG.PHP
<?php
define( 'DOMAIN', 'http://localhost/crud/');

$host_name = "localhost";
$username = "root";
$password = "";
$db_name = "crud";

try {
    $conn = new PDO("mysql:host=$host_name; dbname=$db_name", $username, $password);
    $conn->setAttribute(PDO::ATTR_ERRMODE, PDO::ERRMODE_EXCEPTION);
} catch (PDOException $e) {
    echo "connection failed : ". $e->getMessage();

}
Creating the Index Page
Then the next thing is to create the index page.
- Create a file called index.php and save inside the folder (crud).
- Copy the code below and paste inside the index.php file
INDEX.PHP
<?php
session_start();
require 'config.php';


//get all products from database
$get_products = $conn->prepare("SELECT * FROM products ORDER BY id DESC ");
$get_products->execute();

?>
<!DOCTYPE html>
<html lang="en">
<head>
    <meta charset="UTF-8">
    <meta http-equiv="X-UA-Compatible" content="IE=edge">
    <meta name="viewport" content="width=device-width, initial-scale=1.0">
    <title>CRUD APPLICATION IN PHP</title>
    <link rel="stylesheet" href="style.css">
</head>
<body>
    <h2>CRUD APPLICATION IN PHP</h2>

     <?php
        if (isset($_SESSION['success'])) : ?>
      <div  class="success">
      <?=  $_SESSION['success'];  unset($_SESSION['success']); ?>
     </div>
     <?php elseif (isset($_SESSION['Err'])) : ?>
      <div  class="error">
      <?=  $_SESSION['Err'];  unset($_SESSION['Err']); ?>
     </div>
     <?php endif ?>

        <section>

            <a href="add-Product.php" class="add-products">Add Products</a>

            <table>
                <thead>
                    <th>Image</th>
                    <th>Name</th>
                    <th>Description</th>
                    <th>Options</th>
                </thead>
                <tbody>
                    <?php while( $products = $get_products->fetch(PDO::FETCH_ASSOC) ) : ?>

                <tr>
                    <td>
                        <img src="<?php echo $products['image'] ?>" alt="image">
                    </td>
                    <td><?= $products['name'] ?></td>
                    <td><?= $products['description'] ?></td>
                    <td>
                    <form action="<?= DOMAIN ?>edit-product.php" method="post">
                     <input type="hidden" name="id"  value="<?php echo $products['id'] ?>">
                     <button name="edit" type="submit" class="edit">Edit</button>
                    </form>
                    <form action="<?= DOMAIN ?>Auth/delete-product-auth.php" method="post">
                     <input type="hidden" name="id"  value="<?php echo $products['id'] ?>">
                     <button name="submit" type="submit" class="delete">Delete</button>
                    </form>
                    </td>
                </tr>
                <?php endwhile ?>

                </tbody>
            </table>

        </section>
</body>
</html>
Creating the CSS file
Lets design it by creating the CSS file.
- Create a file called style.css and save inside the folder (crud).
- Copy the css codes below and paste into it
STYLE.CSS
body{
    font-family: Arial, Helvetica, sans-serif;
    display: flex;
    justify-content: center;
    align-items: center;
    flex-direction: column;
    font-size: 15px;
}

section{
    padding: 30px;
    width: 80%;
    box-shadow: 1px 1px 15px rgba(128, 128, 128, 0.267);
}
input{
    height: 50px;
    width:60%;
    font-size: 15pt;
    margin: 10px;
}
input:focus {
    border:1px solid #e9eced;
}

[type="submit"]{
background-color:teal;
color: white;
width:30%;
border:none;
cursor: pointer;
float: right;
}

.add-products{
    background-color: #128525;
    text-decoration: none;
    float: right;
    padding: 15px;
    color: white;
    margin:10px;

}
table{
    width: 100%;
    font-size: 15pt;
    margin-top: 70px;
    border-collapse: collapse;
    text-align: center;

}
td,th{
   padding: 30px;
}
tr{
    border-bottom: 1px solid #ddd;
 }
 img{
    width: 100px;
    height: 100px;
 }
 .edit{
    background-color: #007bff;
    padding: 15px;
    margin:5px ;
    font-size: 13pt;
    width:fit-content;
}
.delete{
    background-color: darkred;
    padding: 15px;
    margin:5px ;
    font-size: 13pt;
    width:fit-content;
 }
 .error{
    color:red;
 }
 .success{
    color: #128525;
 }
Creating the add product page
Then create the add product page.
- Create a file called add-product.php and save inside the folder with the others
- Copy the code below and paste into it.
ADD-PRODUCT.PHP
<?php
session_start();
require 'config.php';

// get back the form info if there was an error
$name = $_SESSION['add-product-info']['name'] ?? null;
$description = $_SESSION['add-product-info']['description'] ?? null;

// delete Err session
unset($_SESSION['add-product-info']);

?>

<!DOCTYPE html>
<html lang="en">
<head>
    <meta charset="UTF-8">
    <meta http-equiv="X-UA-Compatible" content="IE=edge">
    <meta name="viewport" content="width=device-width, initial-scale=1.0">
    <title>CRUD APPLICATION IN PHP</title>
    <link rel="stylesheet" href="style.css">
</head>
<body>
    <h2>Add Products</h2>
    <?php
        if (isset($_SESSION['Err'])) : ?>
      <div  class="error">
      <?=  $_SESSION['Err'];  unset($_SESSION['Err']); ?>
     </div>
     <?php endif ?>
    <a href="index.php" class="add-products">Products</a>
        <section>
            <form action="Auth/add-products-auth.php" method="post" enctype="multipart/form-data">
                <input type="text" name="name" placeholder="Name" value="<?= $name ?>">
                <input type="text" name="description" placeholder="Description" value="<?= $description ?>">
                <input type="file" name="image"  >
                <input type="submit" value="Add" name="submit">
            </form>
          </section>
</body>
</html>
Creating the edit product page
- Create a file called edit-product.php and save.
- Copy the code below and paste into it.
EDIT-PRODUCT.PHP
<?php
require_once "config.php";

if (isset($_POST['id'])) {

    $id =  $_POST['id'] ;
    $get_product = $conn->prepare('SELECT * FROM products WHERE id = :id');
    $get_product->bindValue(':id', $id);
    $get_product->execute();
    $product = $get_product->fetch(PDO::FETCH_ASSOC);
}else{
    header('location: ' . DOMAIN . 'index.php ');
    die();
}

?>

<!DOCTYPE html>
<html lang="en">
<head>
    <meta charset="UTF-8">
    <meta http-equiv="X-UA-Compatible" content="IE=edge">
    <meta name="viewport" content="width=device-width, initial-scale=1.0">
    <title>CRUD APPLICATION IN PHP</title>
    <link rel="stylesheet" href="style.css">
</head>
<body>
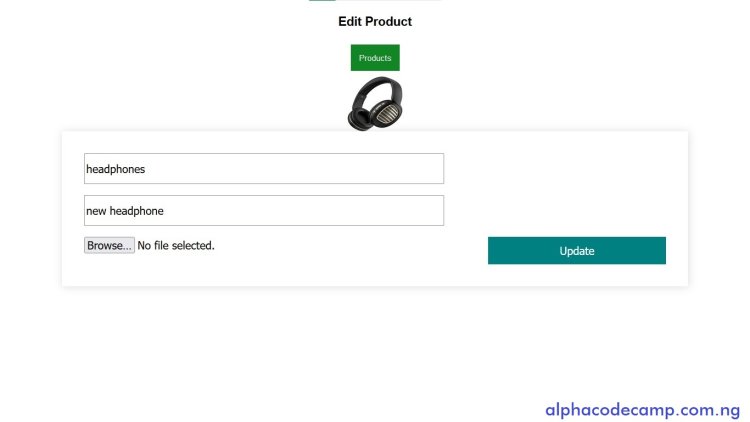
    <h2>Edit Product</h2>
    <a href="index.php" class="add-products">Products</a>
    <img src="<?= $product['image'] ?>" alt="image">

        <section>
            <form action="Auth/edit-products-auth.php" method="post" enctype="multipart/form-data">
            <input type="hidden" name="id" value="<?= $product['id'] ?>">
            <input type="hidden" name="previous_image_name" value="<?= $product['image'] ?>">
                <input type="text" name="name" placeholder="Name" value="<?= $product['name'] ?>">
                <input type="text" name="description" placeholder="Description" value="<?= $product['description'] ?>">
                <input type="file" name="image"  >
                <input type="submit" value="Update" name="submit">
            </form>

        </section>
</body>
</html>
Creating the Add product Authenticate
We need to create a page that will process the products when added and make sure the person adding products is not injecting any MYSQL codes. This is where we validate the form before inserting into the database.
- Create a NEW FOLDER named Auth and save in the folder (see structure below)
- Create a file called add-products-auth.php and save inside the Auth Folder
- Copy the code below and paste into it.
ADD-PRODUCTS-AUTH.PHP
<?php
session_start();
 require '../config.php';

 if(isset($_POST['submit'])){

    $name = filter_var($_POST['name'], FILTER_SANITIZE_FULL_SPECIAL_CHARS);
    $description = filter_var($_POST['description'], FILTER_SANITIZE_FULL_SPECIAL_CHARS);
    $image = $_FILES['image'];

    //validate input values
if (!$name) {
    $_SESSION['Err'] = " Enter Product Name";
}elseif(!$description){
    $_SESSION['Err'] = " Enter Prouduct Description";
}elseif(!$image['name']){
    $_SESSION['Err'] = "Select Product Image";
}else{

    //validate the image
    $time = time();
    $image_name = $time . $image['name']; //renaming the image to unique name
    $image_tmp_name = $image['tmp_name'];

    $image_path = '../image/' . $image_name; //where (folder) the image will be saved
    $image_upload_path = './image/' . $image_name; //the path of the image

     //make sure the file we are getting is an image
     $allowed_ext = ['jpg', 'png', 'jpeg']; //the extension we want

     $extension = explode('.', $image_name);
     $extension = end($extension); //get the uploaded image extension

    //create image folder if image folder does not exist
    if (!is_dir('../image')) {
        mkdir('../image');
    }

    if(!in_array($extension, $allowed_ext)){ //check if the uploaded image extension is jpg, png, jpeg
    $_SESSION['Err'] = "image should be " . ".Jpg, .Png, .Jpeg";
    }
}

//return back to add product if any error (Err) with the error message
if (isset( $_SESSION['Err'])) {
    $_SESSION['add-product-info'] = $_POST; //get back and hold the form data if any error
    header('location: ' . DOMAIN . 'add-product.php');
    die();
}else {

    try{

 //add the uploaded image to image folder
 move_uploaded_file($image_tmp_name, $image_path);

    //insert into the products table
    $insert_product = $conn->prepare("INSERT INTO products (name, description, image)
    VALUES(:p_name, :p_description, :p_image)");

     $insert_product->bindValue(':p_name', $name);
     $insert_product->bindValue(':p_description', $description);
     $insert_product->bindValue(':p_image', $image_upload_path);
     $insert_product->execute();

//show success message
     $_SESSION['success'] = "Product Added successfully";
     header('location: ' . DOMAIN . 'index.php');
     die();

    } catch (PDOException $err) {
        $_SESSION['Err'] = "Could not add product. Error: " . $err->getMessage();
        header('location: ' . DOMAIN . 'add-product.php');
        die();
    }
}


 }

 header('location: ' . DOMAIN . 'add-product.php');
 die();
Creating the Edit product Authenticate
- Create another file called edit-products-auth.php and also save inside the Auth
- Copy the code below and paste into it.
EDIT-PRODUCTS-AUTH.PHP
<?php
session_start();
 require '../config.php';

 if(isset($_POST['submit'])){

     $id = $_POST['id'];
     $name = filter_var($_POST['name'], FILTER_SANITIZE_FULL_SPECIAL_CHARS);
     $description = filter_var($_POST['description'], FILTER_SANITIZE_FULL_SPECIAL_CHARS);
     $image = $_FILES['image'];
     $previous_image_name = $_POST['previous_image_name'];


    //validate input values
if (!$name) {
    $_SESSION['Err'] = " Enter Product Name";
}elseif(!$description){
    $_SESSION['Err'] = " Enter Prouduct Description";
}else{

    //check if a new image was selected
    if ($image['name']) {

     //delete old image if new image is available
     if('.'.$previous_image_name){
        unlink('.'.$previous_image_name);}  //delete the old image

    //validate the image
    $time = time();
    $image_name = $time . $image['name']; //renaming the image to unique name
    $image_tmp_name = $image['tmp_name'];

    $image_path = '../image/' . $image_name; //where (folder) the image will be saved
    $image_upload_path = './image/' . $image_name; //the path of the image

     //make sure the file we are getting is an image
     $allowed_ext = ['jpg', 'png', 'jpeg']; //the extension we want

     $extension = explode('.', $image_name);
     $extension = end($extension); //get the uploaded image extension


    if(in_array($extension, $allowed_ext)){ //check if the uploaded image extension is jpg, png, jpeg

 //add the uploaded image to image folder
 move_uploaded_file($image_tmp_name, $image_path);
    }else{
    $_SESSION['Err'] = "image should be " . ".Jpg, .Png, .Jpeg";
    }
}

}

//return back to add product if any error (Err) with the error message
if (isset( $_SESSION['Err'])) {
    header('location: ' . DOMAIN . 'index.php');
    die();
}else {


    try{
       //upload new image else keep the old image
  $image_to_upload  = $image_upload_path ?? $previous_image_name;

    //insert into the products table
    $insert_user_query = $conn->prepare("UPDATE products SET name = :p_name, description = :p_description, image = :p_image WHERE id = :id ");

     $insert_user_query->bindValue(':id', $id);
     $insert_user_query->bindValue(':p_name', $name);
     $insert_user_query->bindValue(':p_description', $description);
     $insert_user_query->bindValue(':p_image', $image_to_upload);
     $insert_user_query->execute();

//show success message
     $_SESSION['success'] = "Product Updated successfully";
     header('location: ' . DOMAIN . 'index.php');
     die();

    } catch (PDOException $err) {
        $_SESSION['Err'] = "Could not Update product. Error: " . $err->getMessage();
        header('location: ' . DOMAIN . 'index.php');
        die();
    }
}


 }

header('location: ' . DOMAIN . 'index.php');
die();
Creating the Delete product Authenticate
We need to create a page that will help in deleting a product
- Create a file called delete-product-auth.php and save inside the Auth
- Copy the code below and paste into it.
DELETE-PRODUCT-AUTH.PHP
<?php
session_start();
require '../config.php';


 if(isset($_POST['id'])){
    $id =  $_POST['id'] ;

    $get_product = $conn->prepare('SELECT * FROM products WHERE id = :id');
    $get_product->bindValue(':id', $id);
    $get_product->execute();
    $product = $get_product->fetch(PDO::FETCH_ASSOC);

    //check to make sure we get only one product before deleting
    $check_product = $get_product->rowcount();
    if ($check_product == 1) {

        try {

            $product_name =  $product['image'];
            $image_path = '.' . $product_name; //where (folder) the image will be saved


            //delete product image
            if($image_path){
            unlink($image_path);
            }

                   //delete product
    $delete_product = $conn->prepare('DELETE FROM products WHERE id = :id LIMIT 1');
    $delete_product->bindValue(':id', $id);
    $delete_product->execute();

    //success message
    $_SESSION['success'] = "Product deleted  ";

} catch (PDOException $err) {
    $_SESSION['Err'] = "Could not delete Product. Error: " . $err->getMessage();
    header('location: ' . DOMAIN . 'index.php');
    die();
}
    }

 }
 header('location: ' . DOMAIN . 'index.php');
 die();
Structure image

Video Demo
Video demonstration is provided for easy learning
How to downloaded and run the source code
You can download the zipped source code if you like. The zipped source code is attached below.
- Go to the attached zipped file which is below.
- Click on the attached zipped file to start downloading.
- Go to downloads folder on your computer and unzip/ extract it.
- Copy the extracted folder and paste in [Your local disk]/xampp/htdocs directory
- Open XAMPP and start Apache and Mysql
- Open your Browser and Go to localhost/phpmyadmin/
- Create a new database named crud
- Click on import and browse the file crud.php and import it.
- Go to your browser and open localhost/crud
- You can open and edit on your code/ text editor.
Screenshots
index page

edit product page
